原文链接:http://www.juzicode.com/opencv-python-matchtemplate
模板匹配可以实现在源图像中查找特征图像,特征图像一般是一个矩形图像。在前面的文章中桔子菌也介绍到过一些关于“匹配”功能的方法,比如形态学变换中的击中击不中,它的要求非常高,如果像素值存在任何细小差别就会导致击不中,也就是不能匹配,另外比如直方图反映射,可以用来匹配某种颜色的区域。
matchTemplate()模板匹配的过程就是用模板图像作为一个滑动窗口在源图像中滑动,每滑动一个像素,记录该像素处匹配的程度,这个匹配程度是一个浮点型数值,matchTemplate()计算完匹配程度后,可以用minMaxLoc()计算出匹配程度最大的值和位置,或者用阈值化处理找到满足某个阈值位置。
1、函数接口
模板匹配的接口形式:
cv2.matchTemplate(image,templ,method[,result[,mask]])->result- 参数含义:
- image:源图像,待匹配图像,8bit整数型、32bit浮点型,可以是单通道或多通道;
- templ:模板图像,类型同源图像,尺寸必须小于源图像;
- method:匹配方法;
- mask:掩码;
- result:返回结果,32bit浮点型,源图像为W×H,模板图像为w×h,生成的图像对象为(W−w+1)×(H−h+1);
匹配方法TemplateMatchModes有6种,可以用相应的cv2.TM_xxx传入Python接口:
enum  	cv::TemplateMatchModes {
  cv::TM_SQDIFF = 0,
  cv::TM_SQDIFF_NORMED = 1,
  cv::TM_CCORR = 2,
  cv::TM_CCORR_NORMED = 3,
  cv::TM_CCOEFF = 4,
  cv::TM_CCOEFF_NORMED = 5
}
2、模板匹配用法
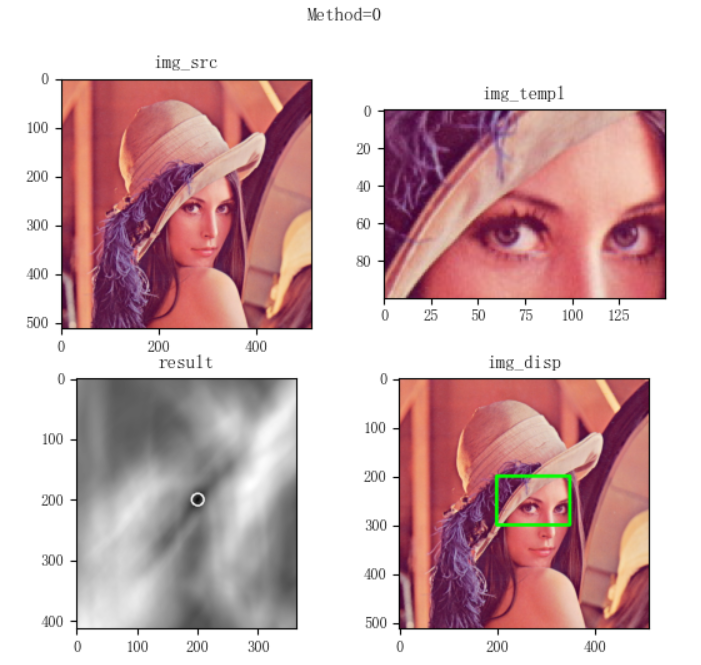
下面这个例子从文件中读出lena图,截取其中一部分作为模板图像,然后用上述6种模式做模板匹配,匹配结束后求出最大的匹配位置,标注并显示出来:
import numpy as np
import matplotlib.pyplot as plt
import cv2
print('VX公众号: 桔子code / juzicode.com')
print('cv2.__version__:',cv2.__version__)
plt.rc('font',family='Youyuan',size='9')
plt.rc('axes',unicode_minus='False')

#读入图像,截图部分作为模板图片
img_src = cv2.imread('..\\lena.jpg' )
img_templ = img_src[200:300,200:350].copy()
print('img_src.shape:',img_src.shape)
print('img_templ.shape:',img_templ.shape)

for method in range(6):
    #模板匹配
    result = cv2.matchTemplate(img_src, img_templ, method)
    print('result.shape:',result.shape)
    print('result.dtype:',result.dtype)
    #计算匹配位置
    min_max = cv2.minMaxLoc(result)
    if method == 0 or method == 1:   #根据不同的模式最佳匹配位置取值方法不同
        match_loc = min_max[2]
    else:
        match_loc = min_max[3]
    #注意计算右下角坐标时x坐标要加模板图像shape[1]表示的宽度,y坐标加高度
    right_bottom = (match_loc[0] + img_templ.shape[1], match_loc[1] + img_templ.shape[0])
    print('result.min_max:',min_max)
    print('match_loc:',match_loc)
    print('right_bottom',right_bottom)
    #标注位置
    img_disp = img_src.copy()
    cv2.rectangle(img_disp, match_loc,right_bottom, (0,255,0), 5, 8, 0 )
    cv2.normalize( result, result, 0, 255, cv2.NORM_MINMAX, -1 )
    cv2.circle(result, match_loc, 10, (255,0,0), 2 )
    #显示图像
    fig,ax = plt.subplots(2,2)
    fig.suptitle('Method=%d'%method)
    ax[0,0].set_title('img_src')
    ax[0,0].imshow(cv2.cvtColor(img_src,cv2.COLOR_BGR2RGB))
    ax[0,1].set_title('img_templ')
    ax[0,1].imshow(cv2.cvtColor(img_templ,cv2.COLOR_BGR2RGB))
    ax[1,0].set_title('result')
    ax[1,0].imshow(result,'gray')
    ax[1,1].set_title('img_disp')
    ax[1,1].imshow(cv2.cvtColor(img_disp,cv2.COLOR_BGR2RGB))
    #ax[0,0].axis('off');ax[0,1].axis('off');ax[1,0].axis('off');ax[1,1].axis('off')
    plt.show()
下面来解析这里例子:
首先读入图像,并截取其中一部分作为模板图像:
img_src = cv2.imread('..\\lena.jpg' )
img_templ = img_src[200:300,200:350].copy()
print('img_src.shape:',img_src.shape)
print('img_templ.shape:',img_templ.shape)

-----
img_src.shape: (512, 512, 3)
img_templ.shape: (100, 150, 3)
matchTemplate()传入待匹配图像和模板图像、匹配方法,得到的结果是一个单通道的float32浮点类型的图像,其宽度为源图像宽度-模板宽度+1=512-150+1=363,高度为512-100+1=363:
    result = cv2.matchTemplate(img_src, img_templ, method)
    print('result.shape:',result.shape)
    print('result.dtype:',result.dtype)
-----
result.shape: (413, 363)
result.dtype: float32
接下来用minMaxLoc()计算最佳匹配位置,当matchTemplated()的method入参为cv2.TM_SQDIFF和cv2.TM_SQDIFF_NORMED(整数值分别为0和1)时,最佳匹配位置在minMaxLoc计算得到的最小值位置处,其他为最大值位置处;另外注意计算匹配位置右下角坐标时x坐标要加模板图像shape[1]表示的宽度,y坐标加高度:
    #计算匹配位置
    min_max = cv2.minMaxLoc(result)
    if method == 0 or method == 1:   #根据不同的模式最佳匹配位置取值方法不同
        match_loc = min_max[2]
    else:
        match_loc = min_max[3]
    #注意计算右下角坐标时x坐标要加模板图像shape[1]表示的宽度,y坐标加高度
    right_bottom = (match_loc[0] + img_templ.shape[1], match_loc[1] + img_templ.shape[0])
    print('result.min_max:',min_max)
    print('match_loc:',match_loc)
    print('right_bottom',right_bottom)

-----method=0时:
result.min_max: (0.0, 366265728.0, (200, 200), (286, 176))
match_loc: (200, 200)
right_bottom (350, 300)
-----method=5时:
result.min_max: (-0.42276841402053833, 1.0, (275, 233), (200, 200))
match_loc: (200, 200)
right_bottom (350, 300)
最后利用计算的起点和右下角标注出匹配的位置,在原图中标注出和模板匹配的方形区域,在匹配结果图像中用圆形标注出匹配度最高的点:
    #标注位置
    img_disp = img_src.copy()
    cv2.rectangle(img_disp, match_loc,right_bottom, (0,255,0), 5, 8, 0 )
    cv2.normalize( result, result, 0, 255, cv2.NORM_MINMAX, -1 )
    cv2.circle(result, match_loc, 10, (255,0,0), 2 )
剩下的就是用matplotlib绘图显示:
不过经过桔子菌实验得到的结果显示,当method=2(cv2.TM_CCORR)时,计算的最佳匹配位置和其它几种方法相差极大,从打印的匹配位置看,method=2时,最佳匹配位置在(178, 74),其他几种匹配正确的方法都是在(200,200):
-----method=2
result.shape: (413, 363)
result.dtype: float32
result.min_max: (545996224.0, 1132292608.0, (67, 405), (178, 74))
match_loc: (178, 74) -----和其他方法差异较大,位置是在(178, 74)
right_bottom (328, 174)
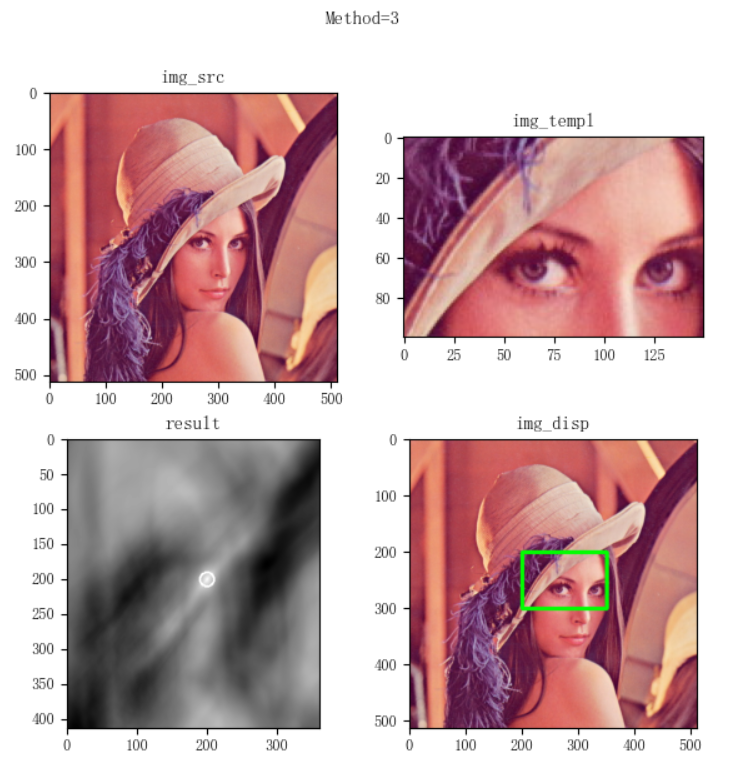
-----method=3
result.shape: (413, 363)
result.dtype: float32
result.min_max: (0.8143631219863892, 1.0, (285, 178), (200, 200))
match_loc: (200, 200) -----其他几种匹配方法都是在(200, 200)
right_bottom (350, 300)
-----method=4
result.shape: (413, 363)
result.dtype: float32
result.min_max: (-52557180.0, 115222456.0, (286, 178), (200, 200))
match_loc: (200, 200)
right_bottom (350, 300)
-----method=5
result.shape: (413, 363)
result.dtype: float32
result.min_max: (-0.42276841402053833, 1.0, (275, 233), (200, 200))
match_loc: (200, 200)
right_bottom (350, 300)另外从显示的图像看标注的匹配图像也是错误的:

3、源图像和模板图像存在差异
上面的例子用的模板图像和源图像中的一部分是完全一样了,为了演示matchTemplate()的匹配能力,我们将前面的例子稍作修改,截取模板后对源图像进行平滑处理,再来看看匹配的结果如何。比如将源图像做一次33×33大小的均值平滑后再匹配:
#读入图像,截图部分作为模板图片
img_src = cv2.imread('..\\lena.jpg' )
img_templ = img_src[200:300,200:350].copy()
img_src = cv2.blur(img_src,(33,33)) ##### 平滑处理
匹配结果显示,除了method=2,其他几种方式的匹配结果和未做平滑处理前几乎是同一个位置,仅相差一两个像素的位置,都在(200,200)附近:
-----method: 0
result.min_max: (42581476.0, 292872064.0, (199, 201), (25, 412))
match_loc: (199, 201)
-----method: 1
result.min_max: (0.04254355654120445, 0.4597490131855011, (199, 202), (77, 386))
match_loc: (199, 202)
-----method: 2
result.min_max: (560473088.0, 1119551744.0, (71, 399), (190, 74))
match_loc: (190, 74)
-----method: 3
result.min_max: (0.8539454936981201, 0.97953861951828, (292, 179), (199, 201))
match_loc: (199, 201)
-----method: 4
result.min_max: (-43949496.0, 62591044.0, (292, 180), (198, 200))
match_loc: (198, 200)
-----method: 5
result.min_max: (-0.5016737580299377, 0.8062169551849365, (279, 225), (199, 202))
match_loc: (199, 202)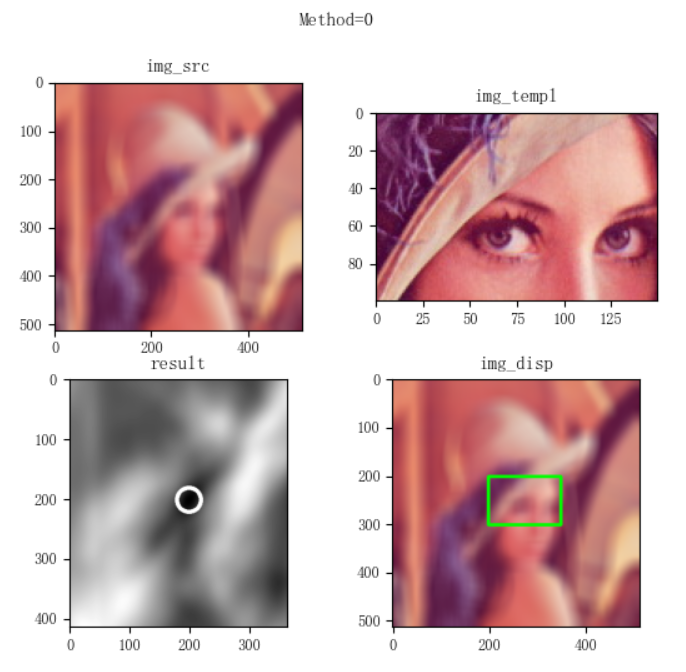
同样地,我们不对源图像做变化,而只是平滑处理模板图像,制造出模板图像和源图像的差异出来:
#读入图像,截图部分作为模板图片
img_src = cv2.imread('..\\lena.jpg' )
img_templ = img_src[200:300,200:350].copy()
img_templ = cv2.blur(img_templ,(33,33))
得到的最佳匹配位置仍然是在(200,200)附近,当然method=2这个特例除外:
-----method: 0
result.min_max: (43080640.0, 286917440.0, (199, 201), (292, 173))
match_loc: (199, 201)
-----method: 1
result.min_max: (0.04257318750023842, 0.42100536823272705, (199, 201), (71, 395))
match_loc: (199, 201)
-----method: 2
result.min_max: (549533312.0, 1130334720.0, (69, 400), (203, 76))
match_loc: (203, 76)
-----method: 3
result.min_max: (0.8450157046318054, 0.9792083501815796, (13, 412), (199, 201))
match_loc: (199, 201)
-----method: 4
result.min_max: (-45648052.0, 61790392.0, (292, 178), (199, 198))
match_loc: (199, 198)
-----method: 5
result.min_max: (-0.5532243251800537, 0.8041226863861084, (291, 182), (199, 199))
match_loc: (199, 199)
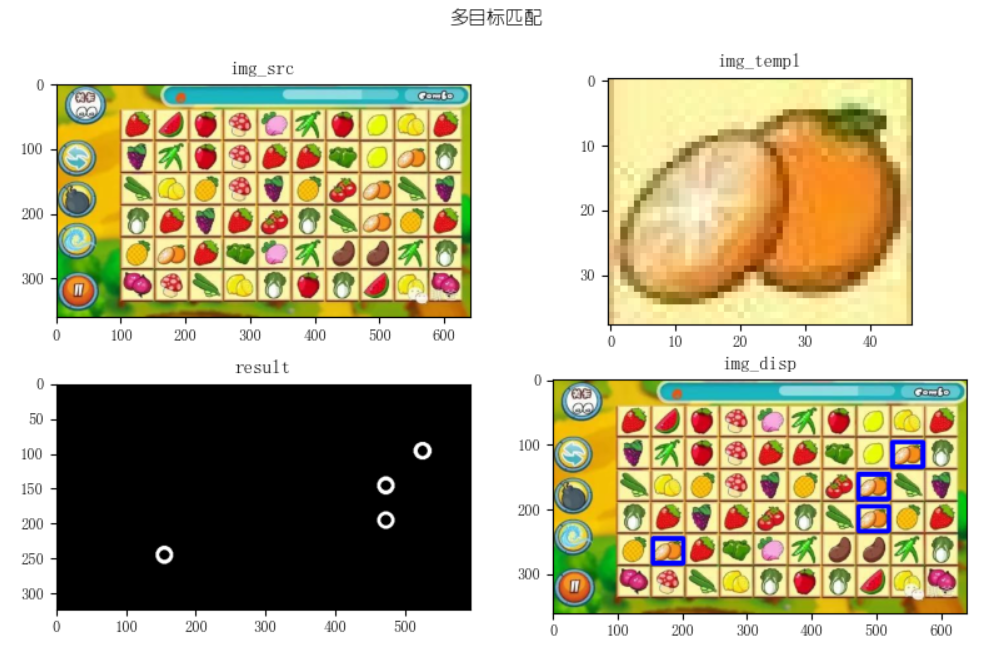
4、多个匹配对象
接下来我们来看下如果源图像中存在多个匹配对象的查找方法,matchTemplate()匹配的结果是一个匹配程度值,执行完matchTemplate()后得到的结果“图像”可以做一次阈值化处理,大于或小于某个阈值的位置就认为是匹配成功的位置。
下面这个例子从源图像中查找出所有的桔子图标并标注出来,处理过程和查找单个匹配对象是类似的,读取源图像、模板图像,用matchTemplate()进行模板匹配,阈值化处理找匹配点,最后是找到起始点和右下角标注和绘图,整个过程不同的地方仅在找匹配点:
import numpy as np
import matplotlib.pyplot as plt
import cv2
print('VX公众号: 桔子code / juzicode.com')
print('cv2.__version__:',cv2.__version__)
plt.rc('font',family='Youyuan',size='9')
plt.rc('axes',unicode_minus='False')

#读入图像,截图部分作为模板图片
img_src = cv2.imread('..\\samples\\picture\\game-link.jpg' )
img_templ = cv2.imread('..\\samples\\picture\\game-link-templ.jpg' )
print('img_src.shape:',img_src.shape)
print('img_templ.shape:',img_templ.shape)

#模板匹配
result_t = cv2.matchTemplate(img_src, img_templ, cv2.TM_CCOEFF_NORMED)
#筛选大于一定匹配值的点
val,result = cv2.threshold(result_t,0.9,1.0,cv2.THRESH_BINARY)
match_locs = cv2.findNonZero(result)
print('match_locs.shape:',match_locs.shape)
print('match_locs:\n',match_locs)

img_disp = img_src.copy()
for match_loc_t in match_locs:
    #match_locs是一个3维数组,第2维固定长度为1,取其下标0对应数组
    match_loc = match_loc_t[0]
    #注意计算右下角坐标时x坐标要加模板图像shape[1]表示的宽度,y坐标加高度
    right_bottom = (match_loc[0] + img_templ.shape[1], match_loc[1] + img_templ.shape[0])
    print('match_loc:',match_loc)
    print('result_t:',result_t[match_loc[1],match_loc[0]])
    #标注位置
    cv2.rectangle(img_disp, match_loc, right_bottom, (0,255,0), 5, 8, 0 )
    cv2.circle(result, match_loc, 10, (255,0,0), 3 )

#显示图像
fig,ax = plt.subplots(2,2)
fig.suptitle('多目标匹配')
ax[0,0].set_title('img_src')
ax[0,0].imshow(cv2.cvtColor(img_src,cv2.COLOR_BGR2RGB))
ax[0,1].set_title('img_templ')
ax[0,1].imshow(cv2.cvtColor(img_templ,cv2.COLOR_BGR2RGB))
ax[1,0].set_title('result')
ax[1,0].imshow(result,'gray')
ax[1,1].set_title('img_disp')
ax[1,1].imshow(cv2.cvtColor(img_disp,cv2.COLOR_BGR2RGB))
#ax[0,0].axis('off');ax[0,1].axis('off');ax[1,0].axis('off');ax[1,1].axis('off')
plt.show()
运行结果:
找匹配点时不能再使用minMaxLoc()的方法找最佳匹配点,因为这种方法只能找到一个最好的匹配值。这里用到阈值化处理,认为大于某个阈值就为匹配上,阈值化处理后用findNonZero()查找非零值的点就是我们要找的匹配点:
#筛选大于一定匹配值的点
val,result = cv2.threshold(result_t,0.9,1.0,cv2.THRESH_BINARY)
match_locs = cv2.findNonZero(result)
print('match_locs.shape:',match_locs.shape)
print('match_locs:\n',match_locs)
运行结果:
match_locs.shape: (7, 1, 2)
match_locs:
 [[[523  96]]
 [[524  96]]
 [[471 145]]
 [[471 146]]
 [[471 195]]
 [[154 244]]
 [[154 245]]]
从上面的结果看match_locs是一个3维数组,(7, 1, 2)的第1维数字7表示有7个位置点匹配上,第2维1为固定值,第3维的2表示每个位置点上x和y的2个坐标值。要得到其中一个坐标,需要使用match_locs[i][0]的方式访问,其中x坐标值为match_locs[i][0][0],y坐标值为match_locs[i][0][1]。
从打印的匹配点位置看,实际上匹配到了7个点,但是从img_disp标注的蓝色框来看只有4个位置,那是因为其中有3组位置和其他的坐标相差只有少数一两个像素,img_disp上标注的蓝色方框显示时重叠了。