内容目录
原文链接:http://www.juzicode.com/image-mnist-get-access-apply
mnist是一个包含0~9的阿拉伯数字手写字体数据集,它由60000个样本组成的训练集和10000个样本组成的测试集。其中每种数据集又分别包含2个文件,分别是图片文件和标签文件。
1、获取mnist数据
数据集下载地址:http://yann.lecun.com/exdb/mnist/,包含4个文件:
train-images-idx3-ubyte.gz: 60000个训练图片
train-labels-idx1-ubyte.gz: 60000个训练标签
t10k-images-idx3-ubyte.gz: 10000个测试图片
t10k-labels-idx1-ubyte.gz: 10000个测试标签
网站上提供的是压缩版本,下载到本地后先进行解压。
2、mnist文件格式
每个mnist文件的格式如下图所示:
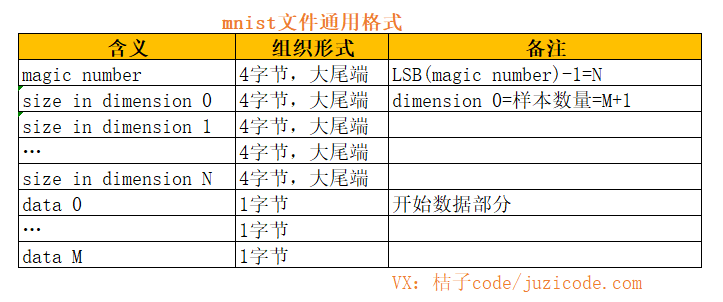
dimension N的值由magic numbe决定,N=LSB(magic number)-1,也就是magic number最后一各字节减1得到。其中dimension0的值为样本数量。文件头大小为1个4字节的magic number+(N+1)个4字节的dimension。这里先减一再加一,绕来绕去是为了符合起始从0开始的习惯,实际上magic number最后一个字节就是dimension的数量。
前面讲的是通用格式,下面是对应到图片和标签文件的格式。
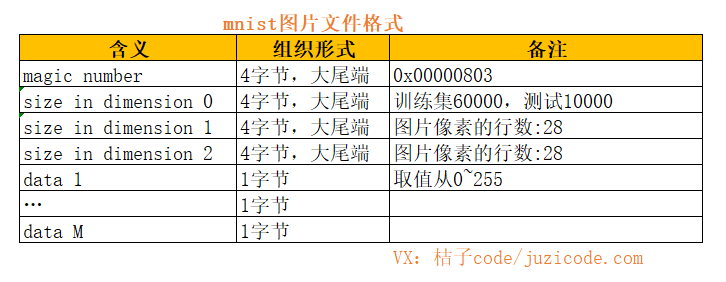
图片文件train-images-idx3-ubyte和t10k-images-idx3-ubyte的magic number都是0x00000803,其中0x08表示data部分的类型为uchar型,0x03表示dimension的数量为3,其中dimension0表示数据的个数,train-images-idx3-ubyte有60000个,t10k-images-idx3-ubyte有10000个,2个图片文件的dimension1和dimension2都为28,表示图片的高宽(行列数),这样文件头长度head_len=4字节*1(magic number个数)+4字节*3(dimension个数)=16字节。
剩下的内容为数据部分,每28*28个字节为一张图片,这样第m张图片的起始位置就是:16(文件头长度)+28(高)*28(宽)*m。

标签文件train-labels-idx1-ubyte.和t10k-labels-idx1-ubyte的magic number都是0x00000801,其中0x08表示data部分的类型为uchar型,0x01表示dimension的数量为1,其中dimension0表示数据的个数,train-labels-idx1-ubyte有60000个,10k-labels-idx1-ubyte有10000个。标签文件的文件头长度head_len=4字节*1(magic number个数)+4节*1(dimension个数)=8字节。
剩下的内容为数据部分,每个字节表示一个标签。
有了前面对文件的分析,下面根据分析结果对文件做读出操作。
3、从文件读出数据
3.1、读出文件头
首先是获取文件头中的样本数量和文件头的长度,有了文件头长度就可以根据文件头长度偏移到相应位置获取某一个图片或标签的值。
def get_head_info(filename):
    dimension = []
    with open(filename,'rb') as pf:
        data = pf.read(4)#获取magic number
        magic_num = int.from_bytes(data,byteorder='big')#bytes格式大尾端模式转换为int型
        dimension_cnt = magic_num & 0xff #获取dimension的长度,magic number最后一个字节
        for i in range(dimension_cnt):
            data = pf.read(4)  #获取dimension数据,dimension[0]表示图片的个数,图片文件中dimension[1][2]分别表示其行/列数值
            dms = int.from_bytes(data,byteorder='big')
            dimension.append(dms)

    sample_count = dimension[0]
    head_length = 4*len(dimension)+4
    return head_length ,sample_count
入参filename是图片或标签的文件名称。
打开文件后,首先读出的4个字节是其magic number,需要将大尾端模式的字节数据转换为int类型。然后将magic number和0xff相与得到其最后一个字节,表示dimension的数量,然后循环读出所有的dimension的值。其中dimension[0]表示样本的数量,文件头的长度为4*len(dimension)+4。最后返回文件头长度和样本数量。
3.2、读出图片数据
有了文件头信息,利用这些信息就可以获取某个指定偏移位置的图片或者标签,下面我们现来看获取图片数据:
#mnist单个图片的大小
IMAGE_ROW = 28
IMAGE_COL = 28
def read_image_p(pf,head_len,offset):
    image = np.zeros((IMAGE_ROW,IMAGE_COL),dtype=np.uint8)#创建空白数组
    pf.seek(head_len+IMAGE_ROW*IMAGE_COL*offset) #指向offset个图片的位置
    for row in range(IMAGE_ROW):
        for col in range(IMAGE_COL):
            data = pf.read(1)#单个字节读
            pix = int.from_bytes(data,byteorder='big')#byte转为int
            image[row][col] = pix
    return image
入参pf为打开文件对象,head_len为get_head_info()返回的文件头长度,offset表示要获取的第offset个图像。
该函数中首先创建一个28×28大小的numpy数组,然后将文件指针指向文件的head_len+IMAGE_ROW*IMAGE_COL*offset处,也就是第offset个图像的起始位置。接下来读出IMAGE_ROW*IMAGE_COL个数据,依次赋值给numpy数组,然后返回该数组,也就得到了第offset个图像的数据。
3.3、读取标签数据
接下来看如何获取标签数据:
def read_label_p(pf,head_len,offset):
    pf.seek(head_len+offset) #指向offset个标签的位置
    data = pf.read(1)
    label = int.from_bytes(data,byteorder='big')#由byte转换为int类型,
    return label
入参pf为打开文件对象,head_len为get_head_info()返回的文件头长度,offset表示要获取的第offset个标签。
首先将文件指针指向文件的head_len+offset处,也就是第offset个标签的起始位置。接下来读出1个字节的数据,转换为int类型后返回。
4、应用例子
4.1、显示标签和图片
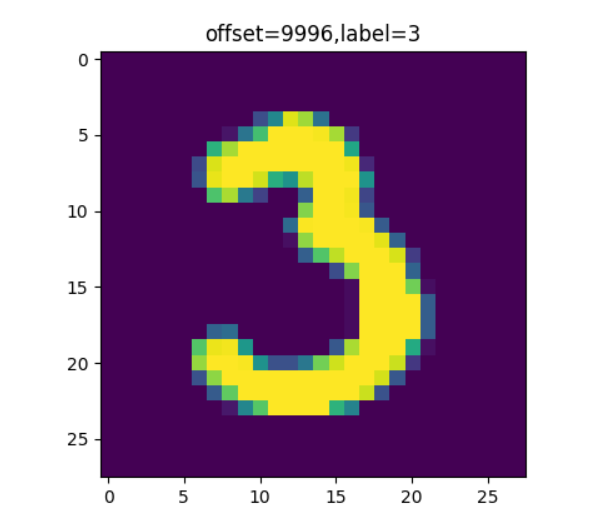
下面这个例子利用前面写的几个函数显示指定的某个偏移开始的图像:
#juzicode.com/VX公众号:桔子code
import os,sys
import matplotlib.pyplot as plt
import mnist #包含读文件头,读图像文件,读标签文件

def main_show(file_path,offset,sample_count=10,type='train'):
    image_file = file_path+'train-images.idx3-ubyte'
    label_file = file_path+'train-labels.idx1-ubyte'
    if type!='train':
        image_file = file_path+'t10k-images.idx3-ubyte'
        label_file = file_path+'t10k-labels.idx1-ubyte'

    #解析文件头
    image_head_len,image_amout = mnist.get_head_info(image_file)
    label_head_len,label_amout = mnist.get_head_info(label_file)
    #检查样本数量
    if sample_count<0:
        sample_count = image_amout
    if sample_count+offset>image_amout:
        sample_count = image_amout-offset
    #读出文件显示图片和标签
    with open(image_file,'rb') as pf_image, open(label_file,'rb') as pf_label:
        for __ind in range(sample_count):
            ind = __ind + offset
            img = mnist.read_image_p(pf_image, image_head_len, ind)
            label= mnist.read_label_p(pf_label, label_head_len, ind)
            plt.imshow(img)
            plt.title('offset=%d,label=%d'%(ind,label))
            plt.show()

if __name__ == '__main__':
    main_show('mnist\\',offset=9996,sample_count=5,type='test')
首先根据type决定是访问训练集还是测试集,数据集文件放在file_path子目录下。然后读取文件头信息,根据读出的文件头和读出的样本数量和传入的想显示的样本数量做对比,检查样本数量并限制其范围。接下来打开图片文件和标签文件,并读出数据在matplotlib里显示offset、标签值、图片。
4.2、将图片数据集转换为tif图片文件
下面这个例子从图片文件中第offset个偏移开始,读出sample_count个图片,并生成tif文件:
#juzicode.com/VX公众号:桔子code
import os,sys
import mnist #包含读文件头,读图像文件,读标签文件
import imageio

#生成tif图片
def main_gen_tif(file_path,tif_name,offset,sample_count=10,type='train'):
    image_file = file_path+'train-images.idx3-ubyte'
    if type!='train':
        image_file = file_path+'t10k-images.idx3-ubyte'
    #解析文件头
    image_head_len,image_amout = mnist.get_head_info(image_file)
    #检查样本数量
    if sample_count<0:
        sample_count = image_amout
    if sample_count+offset>image_amout:
        sample_count = image_amout-offset
    #读出文件
    if not tif_name.endswith('tif') or not tif_name.endswith('tiff'):
        tif_name += '.tif'
    writer= imageio.get_writer(tif_name)
    with open(image_file,'rb') as pf_image:
        for __ind in range(sample_count):
            ind = __ind + offset
            img = mnist.read_image_p(pf_image, image_head_len, ind)
            writer.append_data(img)
    writer.close()
    return 0

if __name__ == '__main__':
    main_gen_tif('mnist\\','mnist-train',offset=1000,sample_count=10,type='train')
这个例子首先仍然根据type决定是访问训练集还是测试集,数据集文件放在file_path子目录下。然后读取文件头信息,根据读出的文件头和读出的样本数量,检查样本数量并限制其范围。接下来打开图片文件,并从文件中读出单张图片再使用imageio生成tif文件。